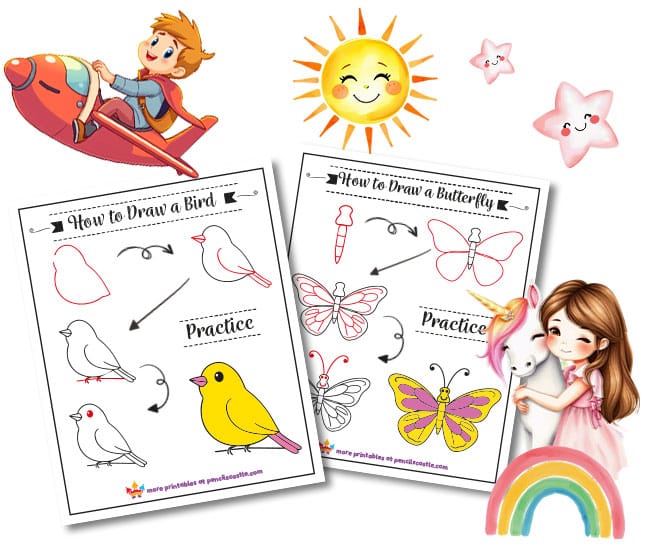
Welcome to the Pencils Castle Drawing Hub! This is your ultimate, constantly growing collection of Easy Drawing Guides for Kids, currently featuring dozens of fun, creative, and adorable subjects.
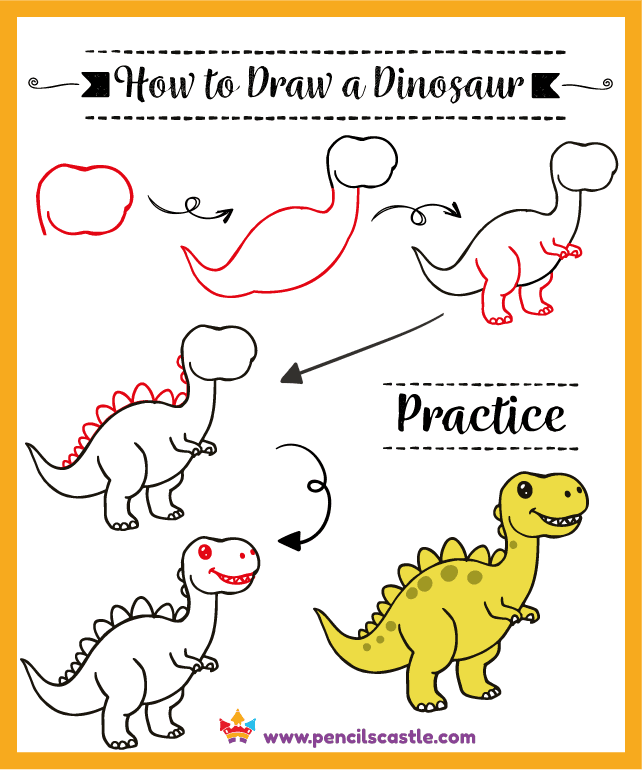
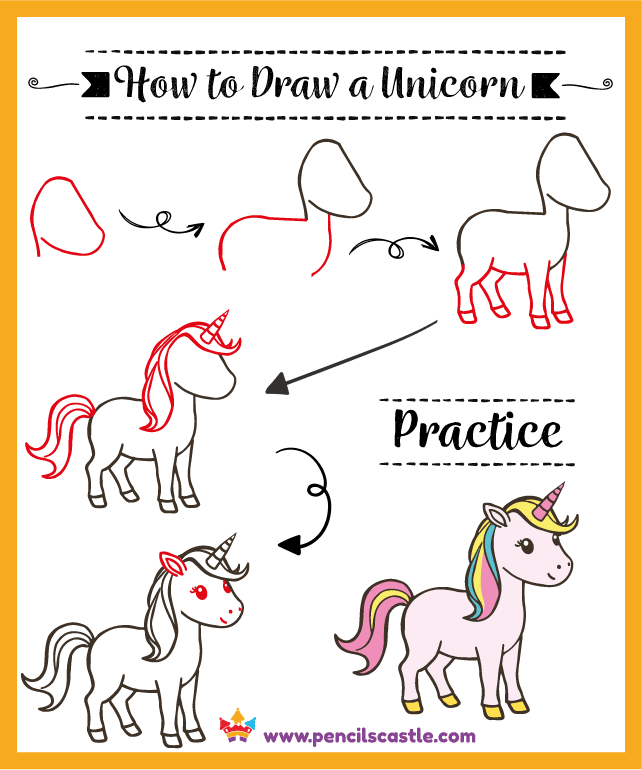
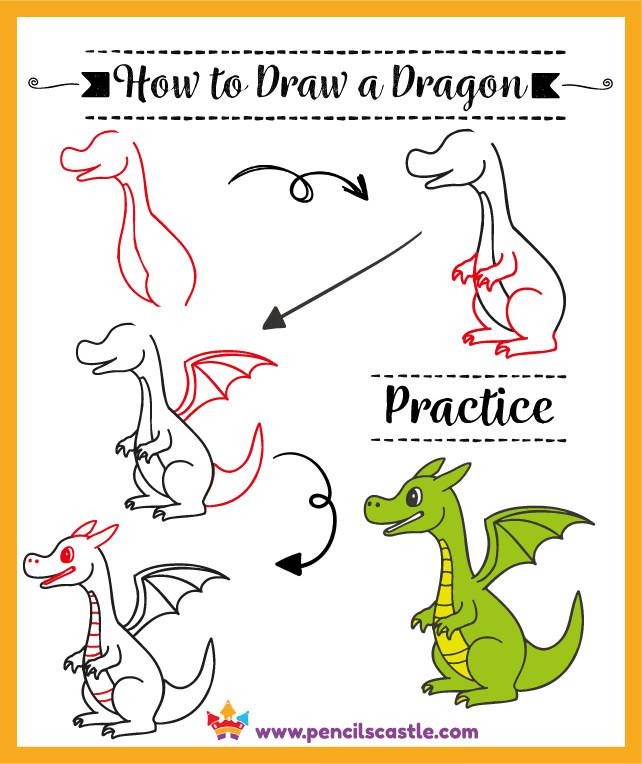
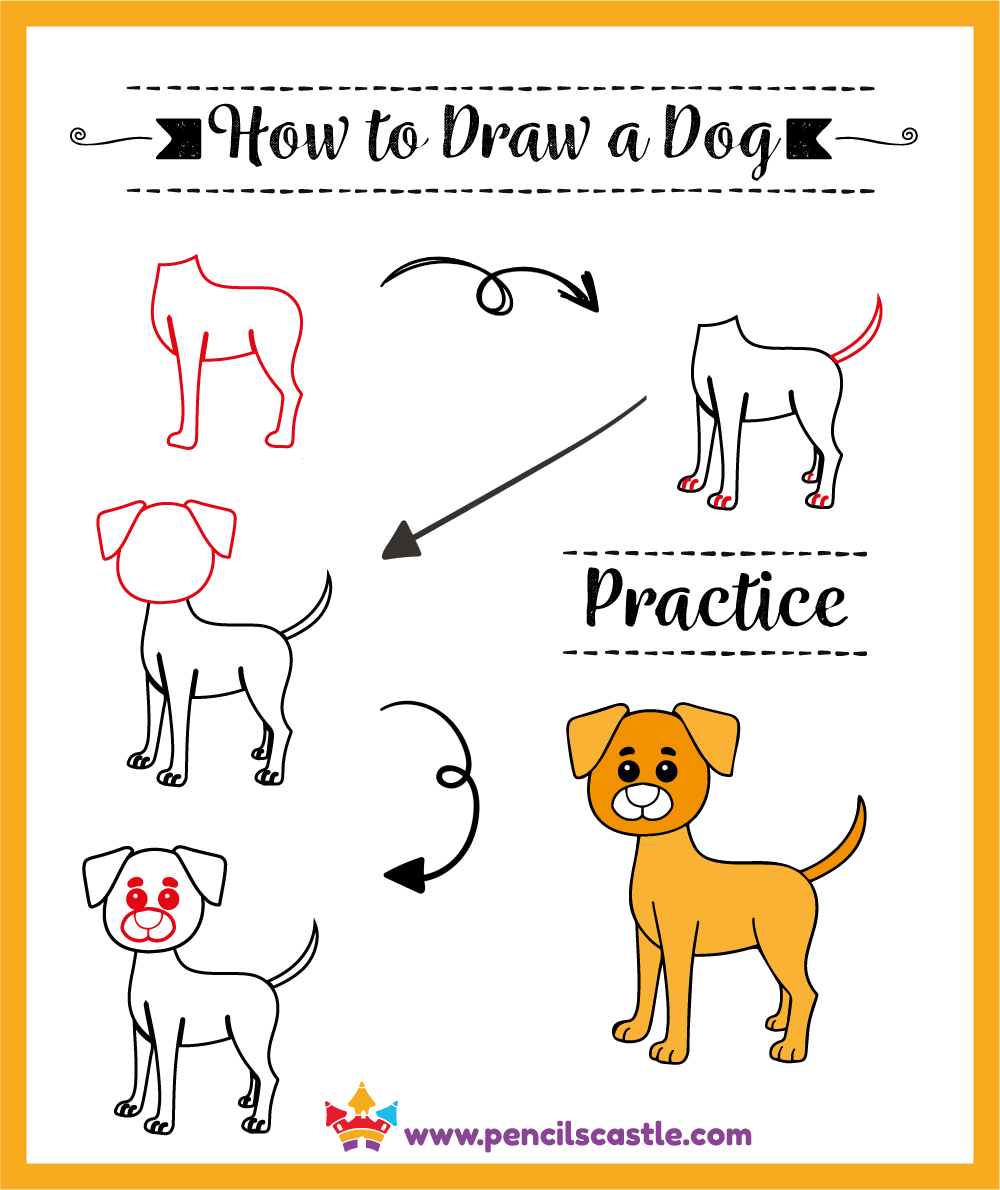
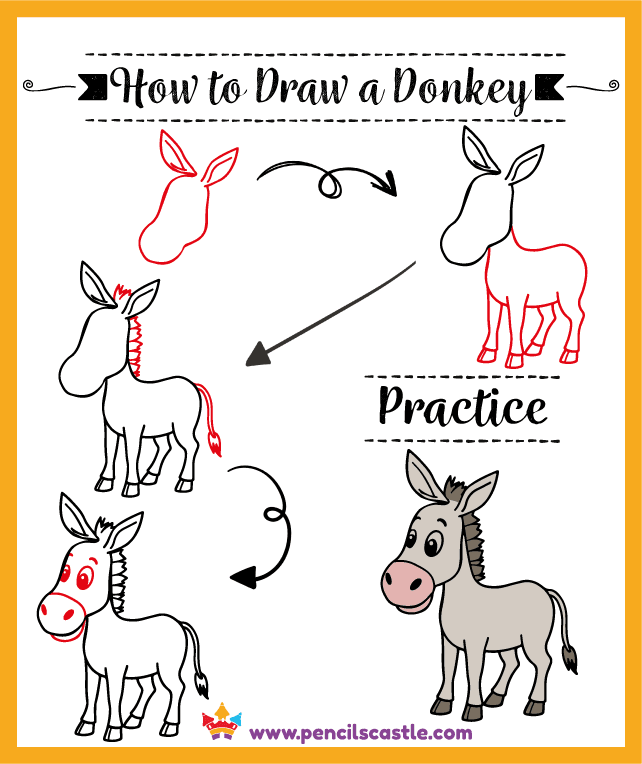
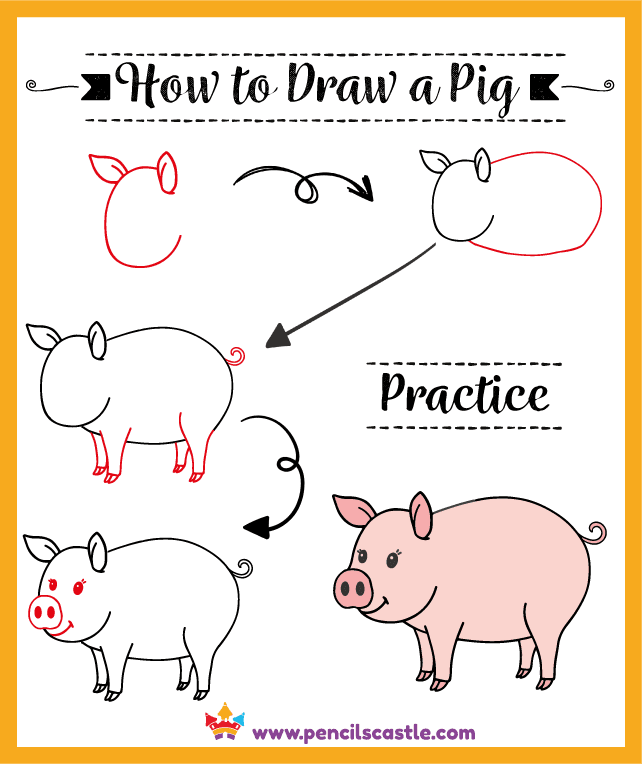
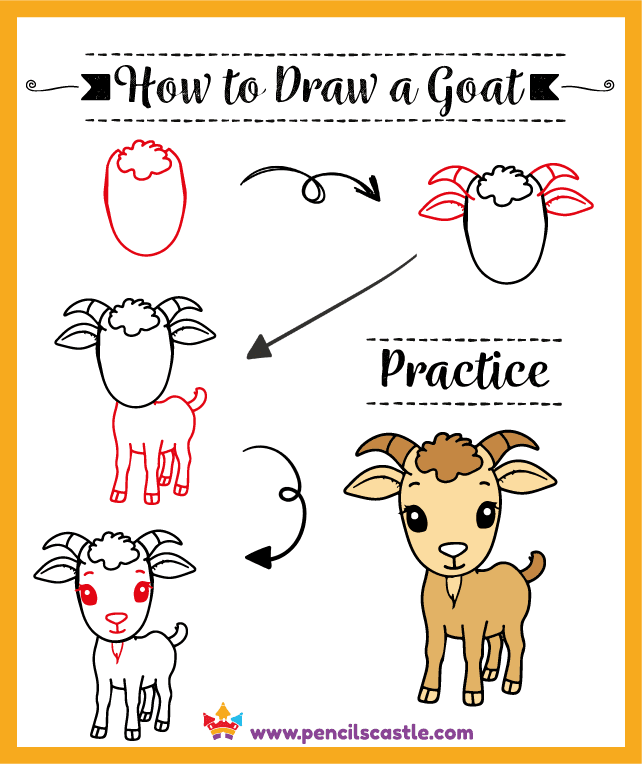
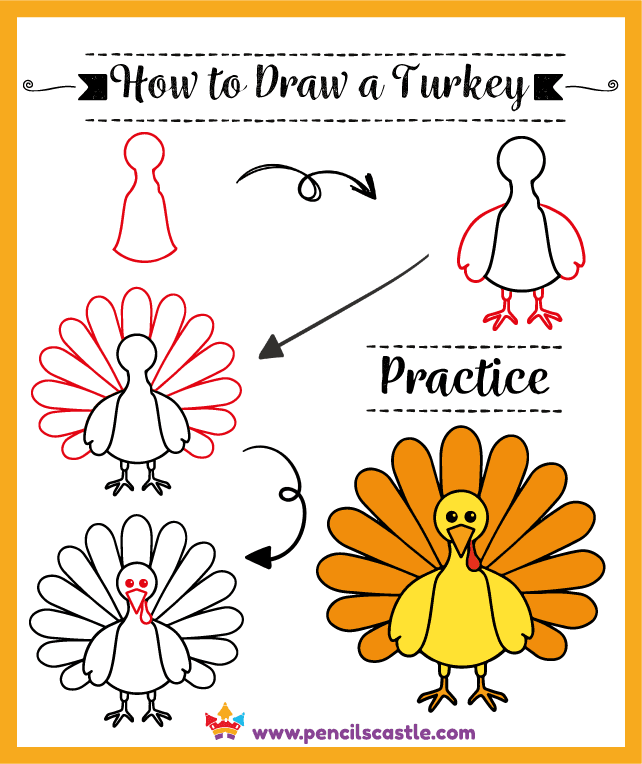
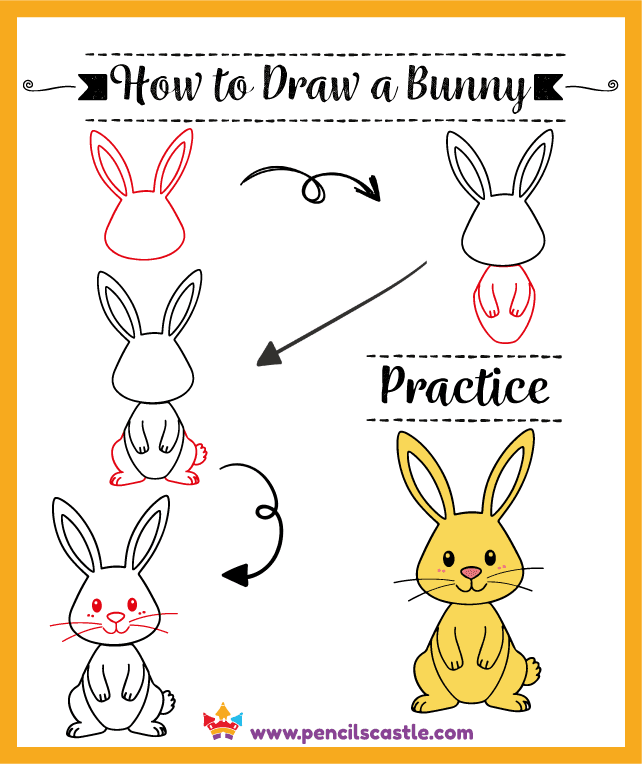
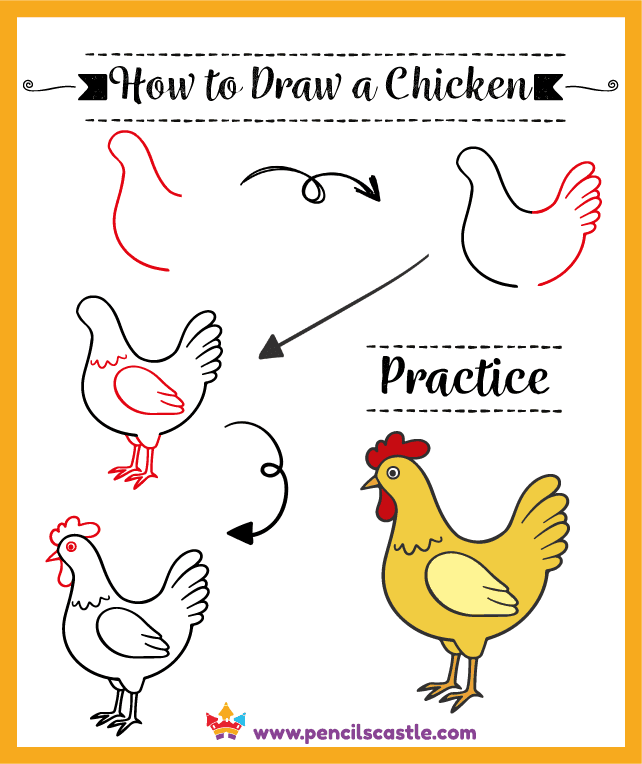
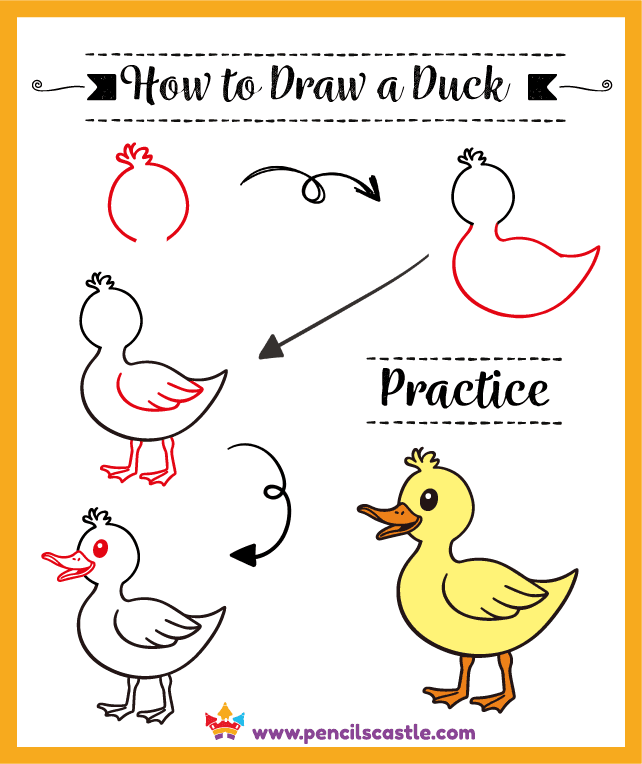
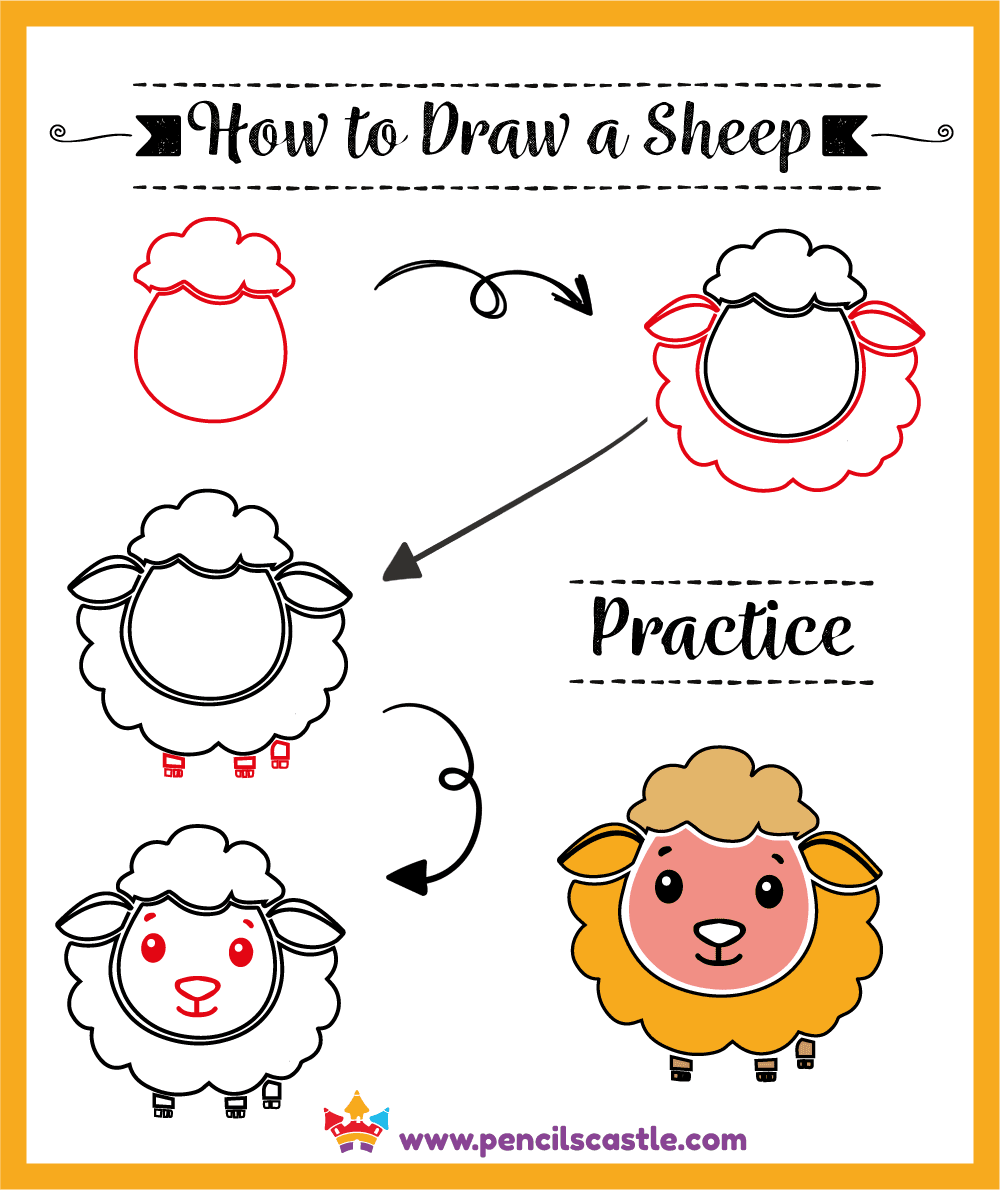
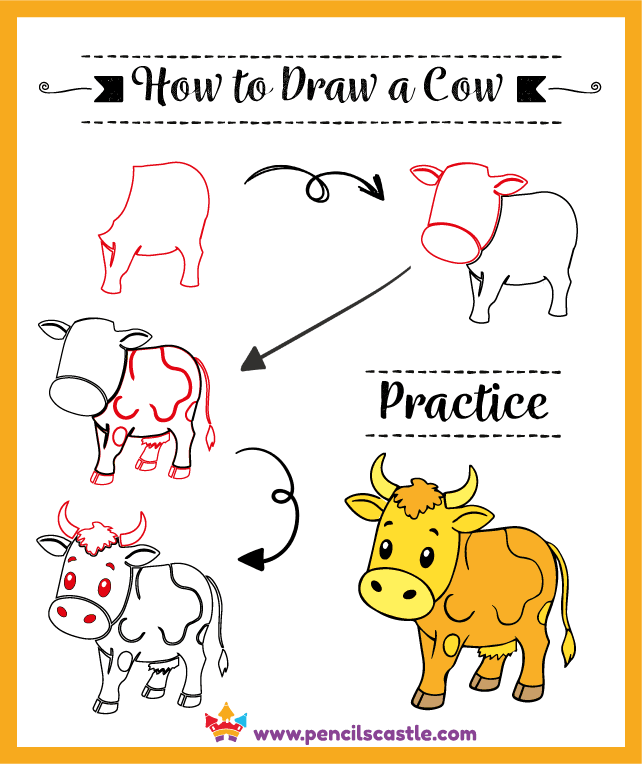
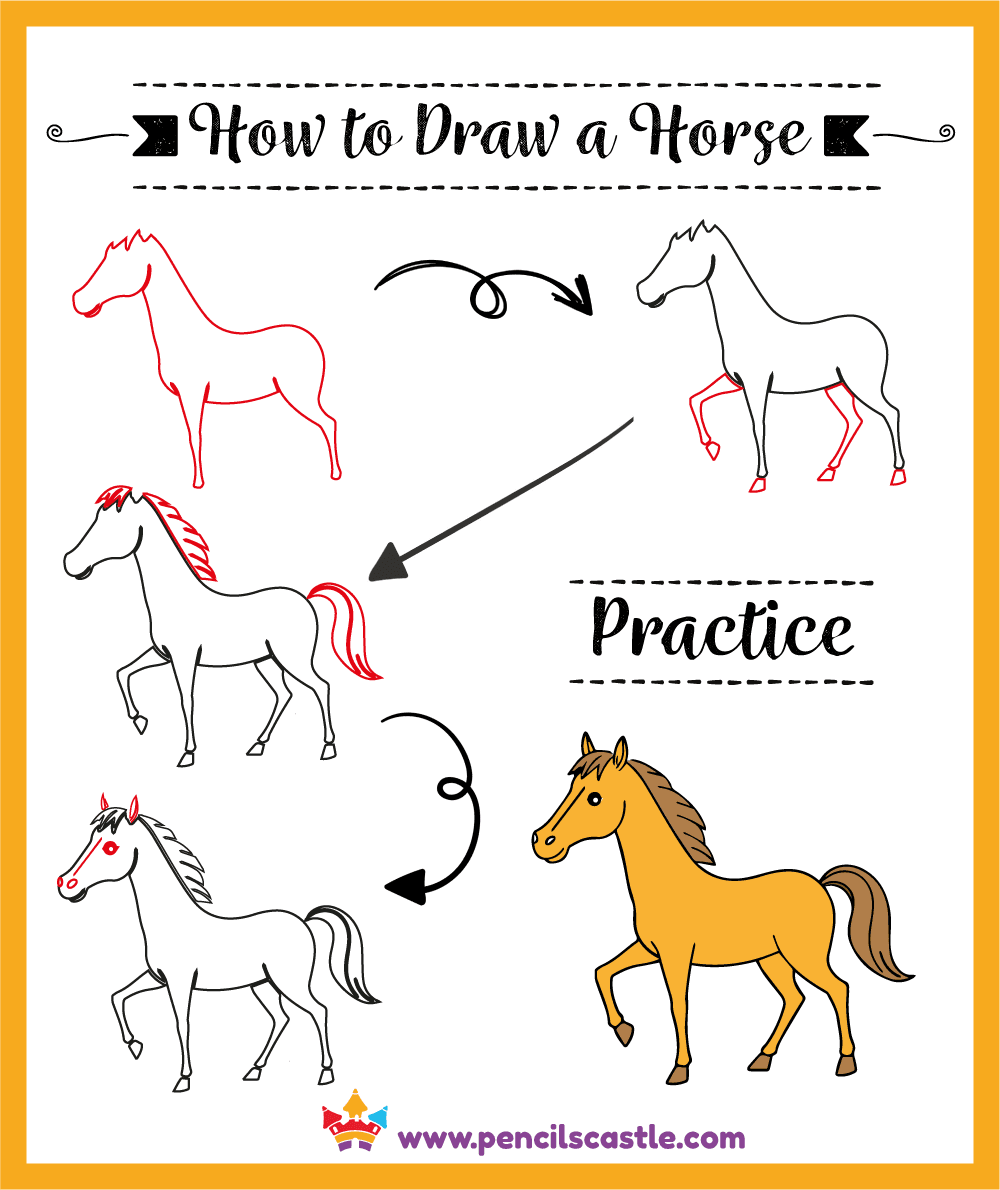
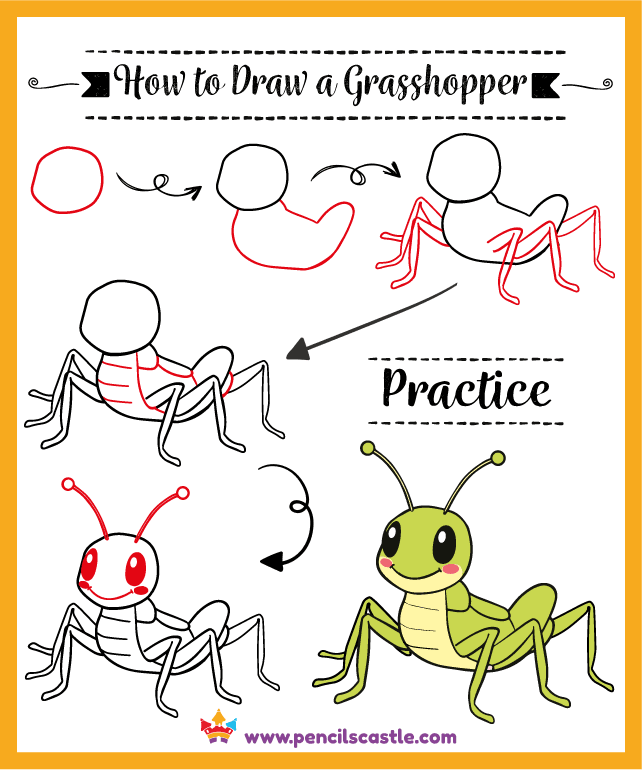
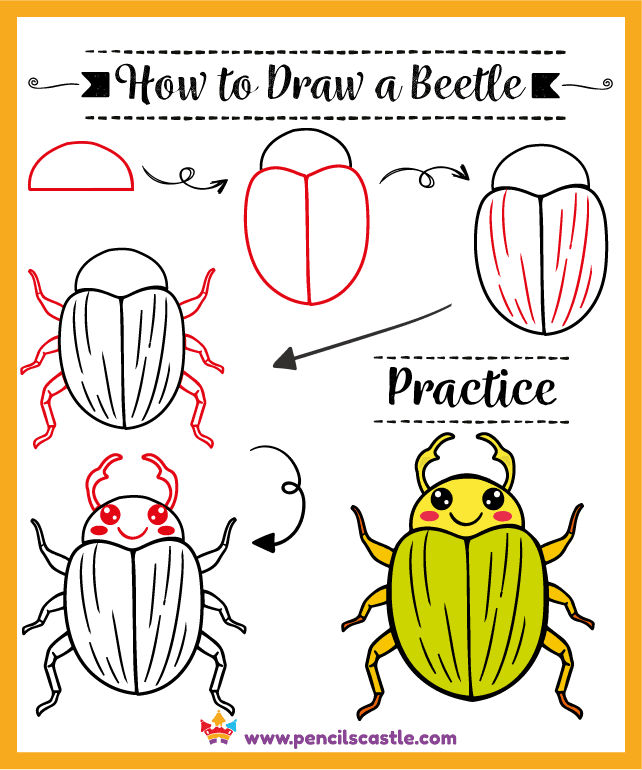
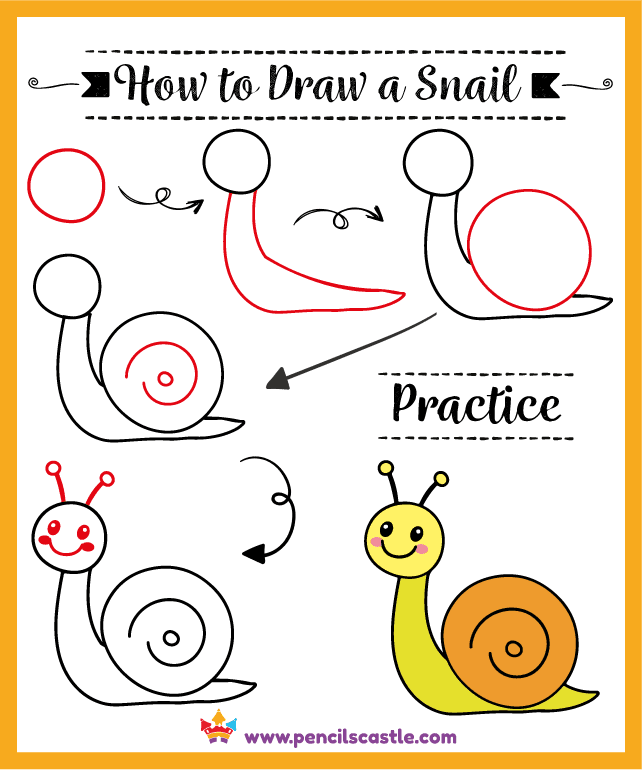
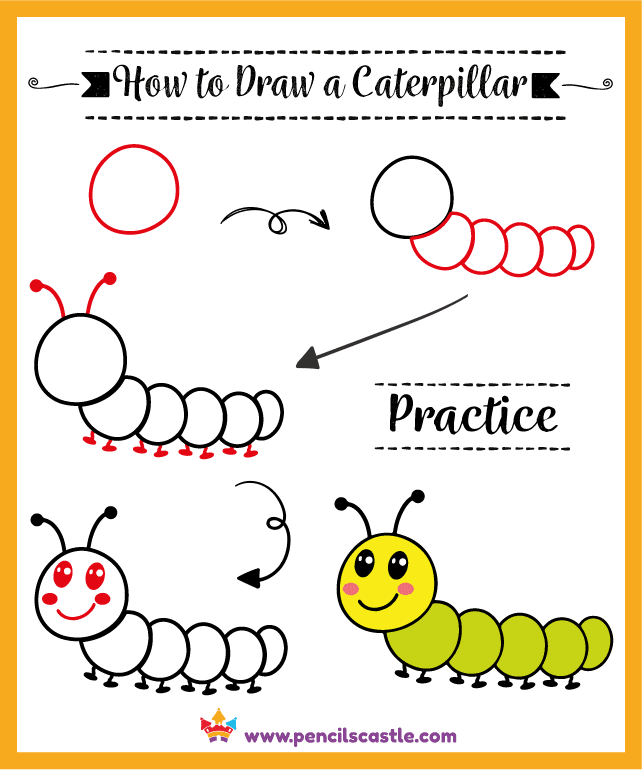
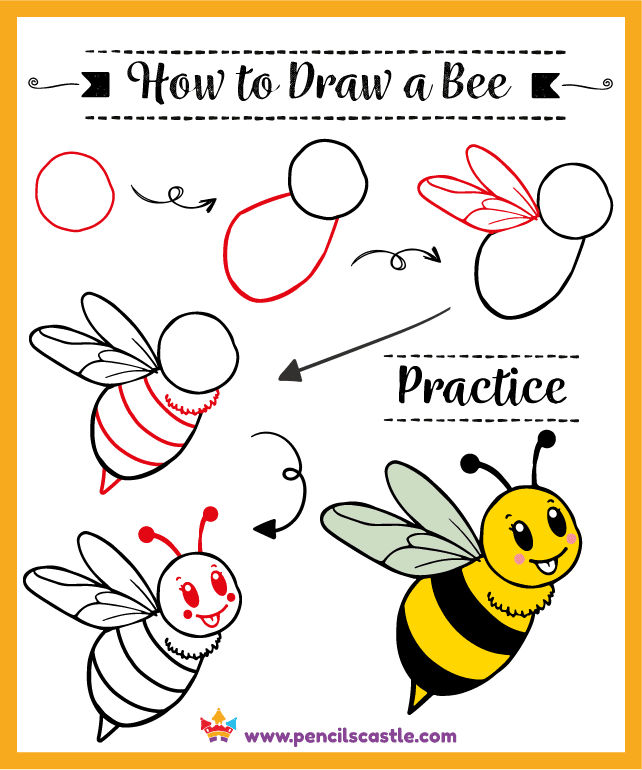
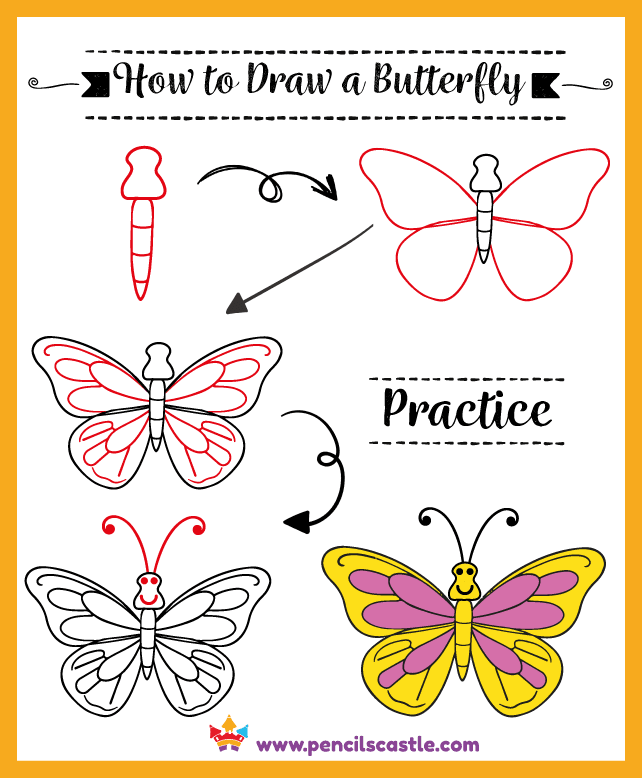
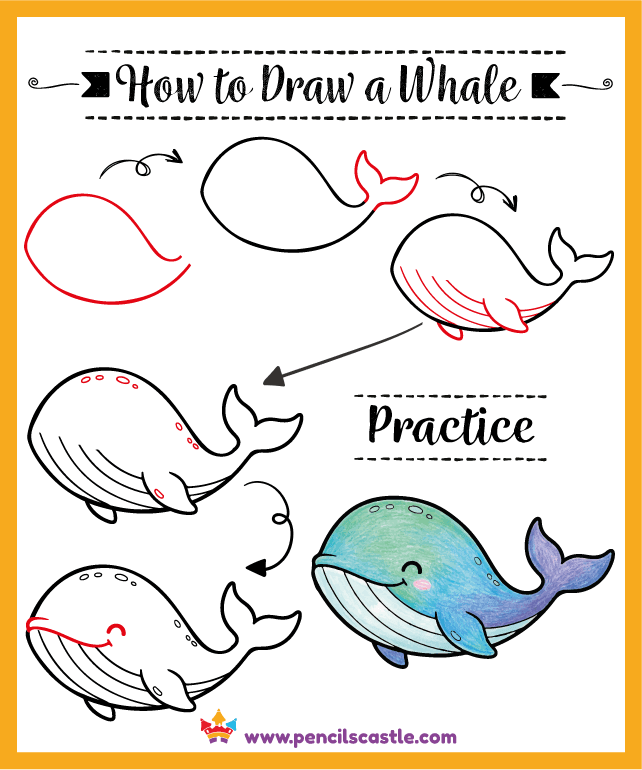
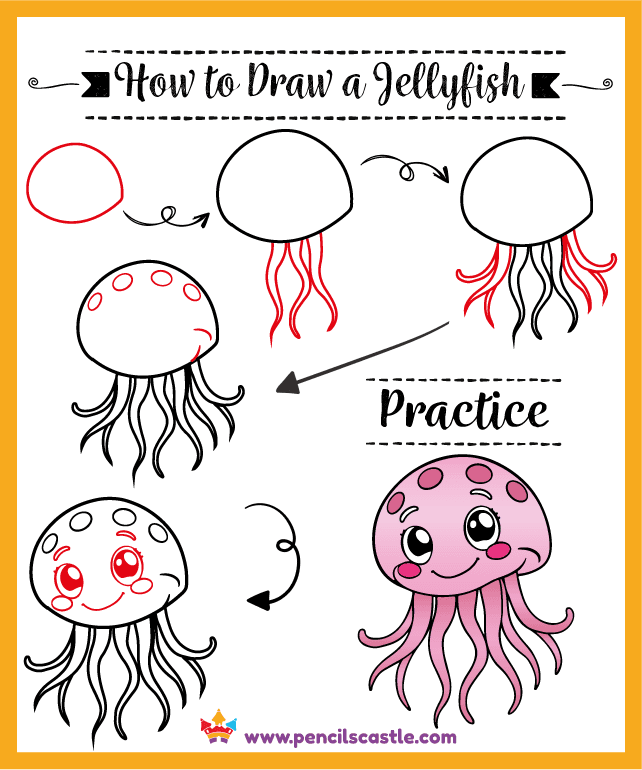
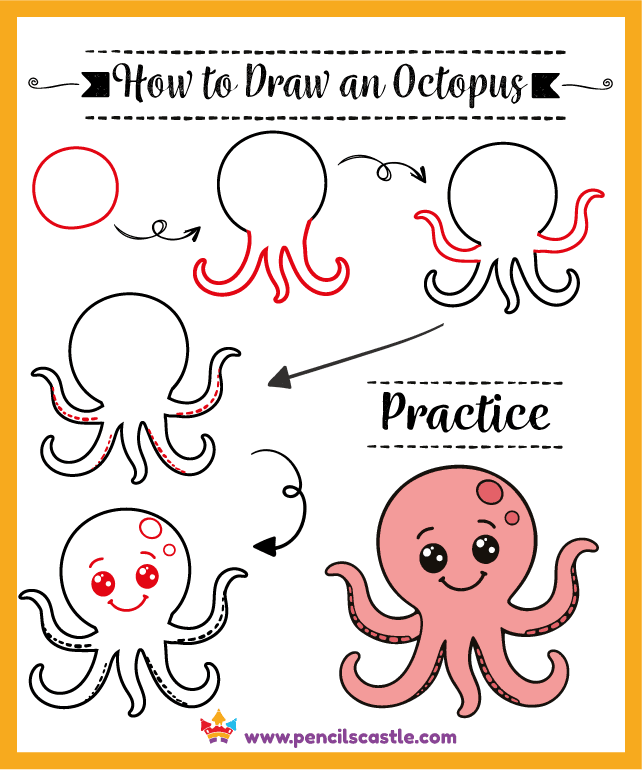
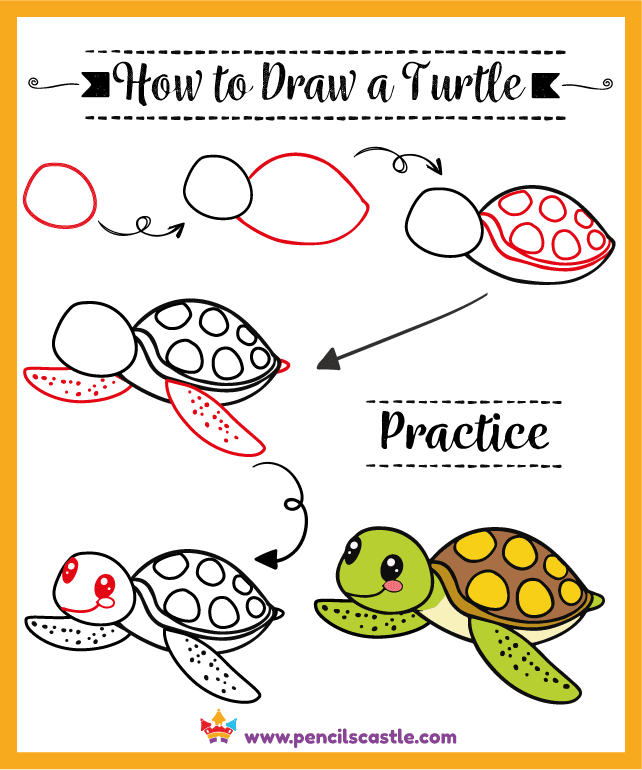
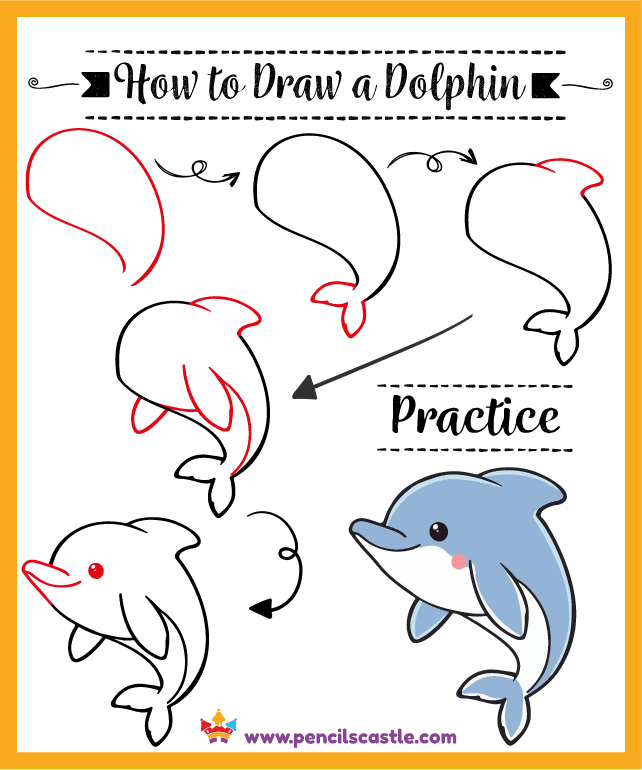
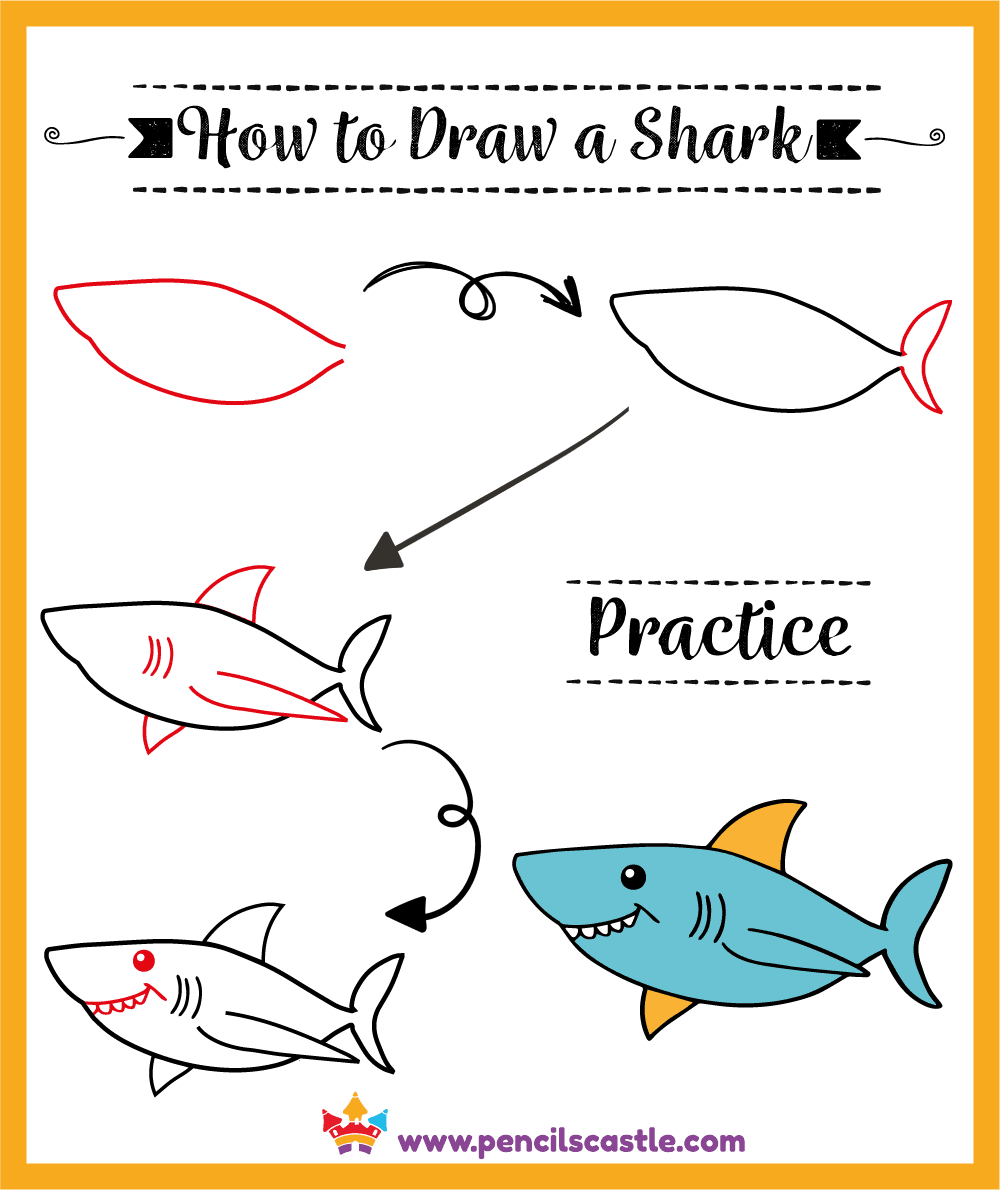
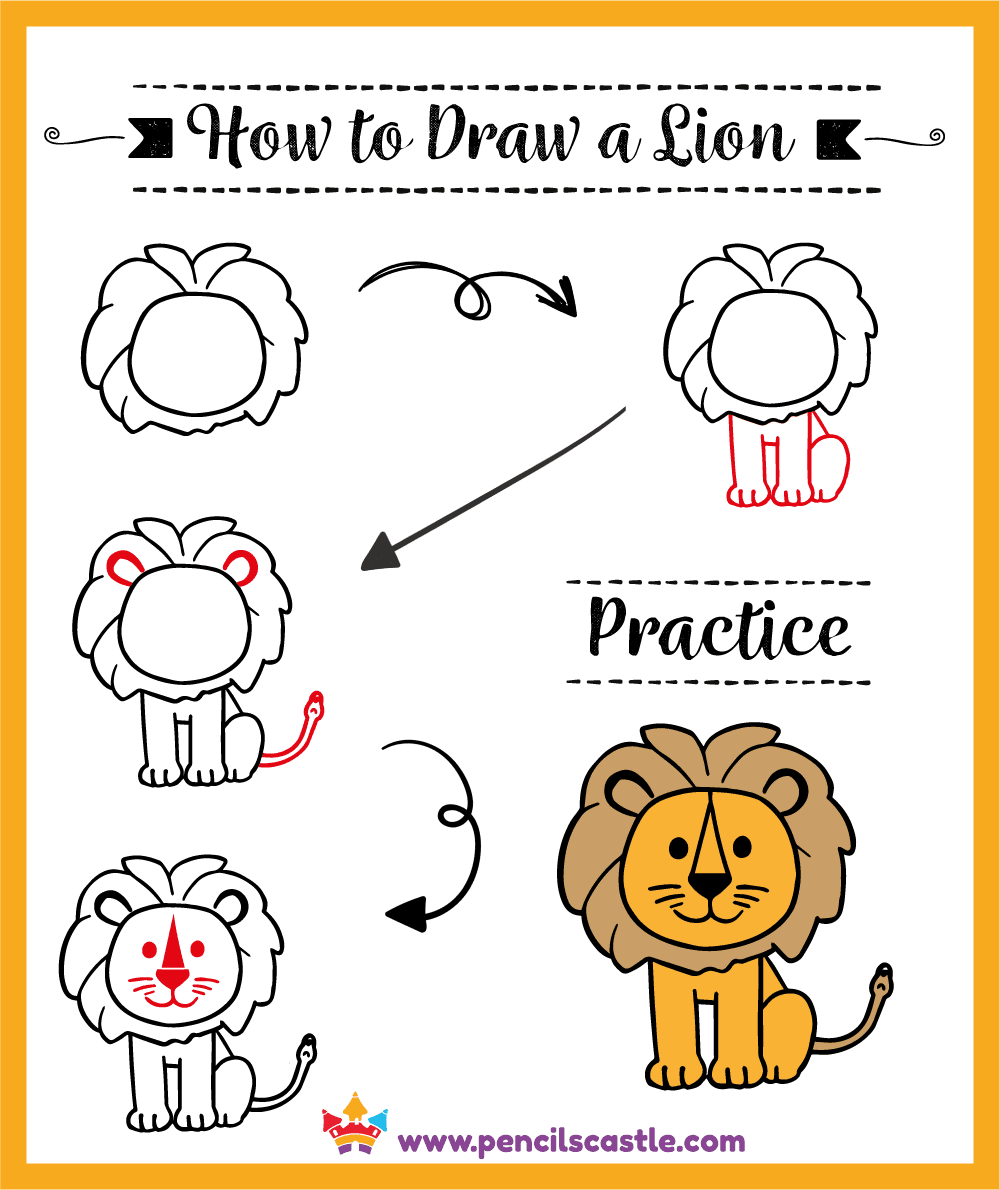
Designed by a senior graphic designer, our Simple Step-by-Step Tutorials break down complex shapes into manageable lines, guaranteeing success for absolute beginners, young artists, and everyone in between. Get ready to grab your pencil and paper—it’s time to learn how to draw!
We are dedicated to making the learning process simple, high-quality, and completely stress-free. With every guide, you get:
- Original Artwork: Every tutorial is based on our professional, original designs, ensuring a polished, modern, and high-quality final result every time.
- Simple Steps: Our easy-to-follow instructions focus on core shapes and sequential progression, making even complex subjects accessible to young hands and minds.
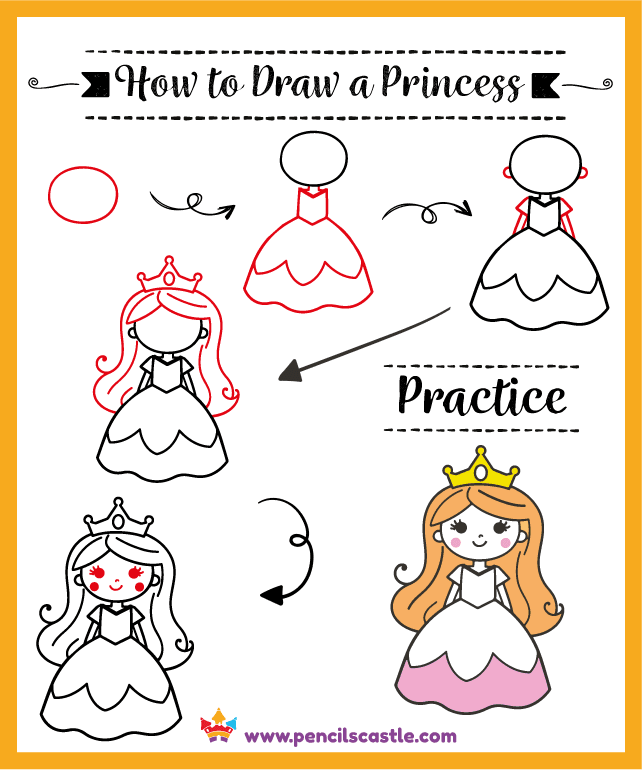
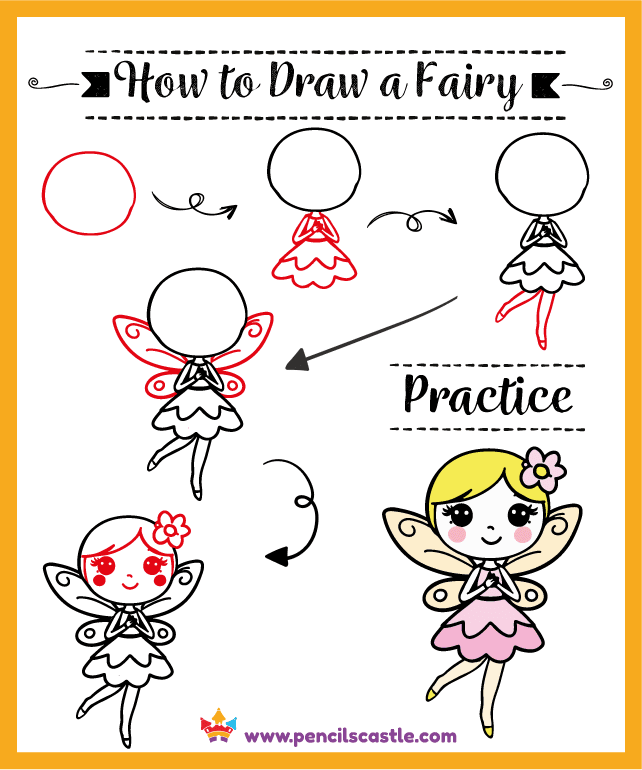
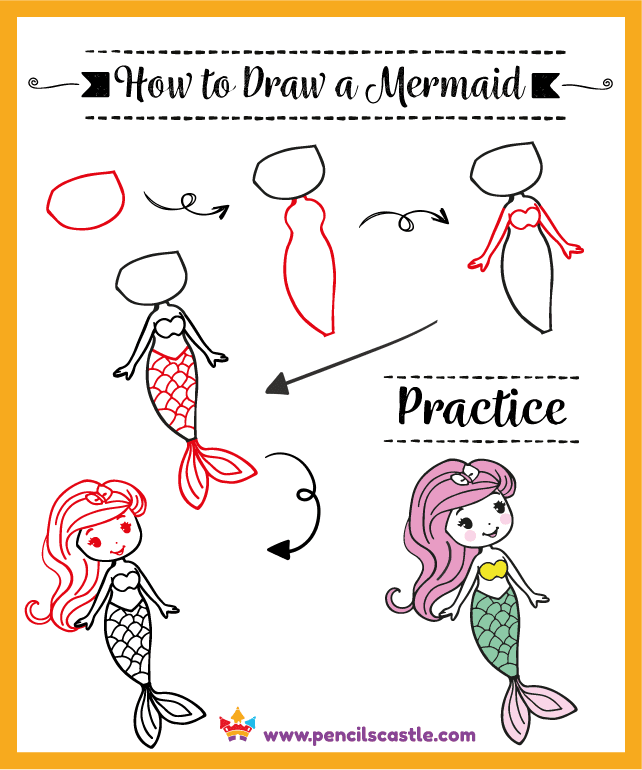
- Free Printable Worksheets: Access a printable PDF practice sheet with every guide! This valuable resource includes the full step-by-step instructions plus a blank space for immediate, hassle-free drawing practice.
- Themed Collections: Explore our organized collections—from cute animals to magical creatures—allowing you to turn drawing practice into themed educational fun.
Whether you need a calming, screen-free break or a themed educational activity, you can dive into our easy drawing guides right now to master new skills and keep kids entertained and inspired.
Magical Creatures Drawing Guides
Animals Drawing Guides
Pets
Farm Animals
Bugs and Insects


Sea Animals
Zoo, Safari, and Jungle Animals

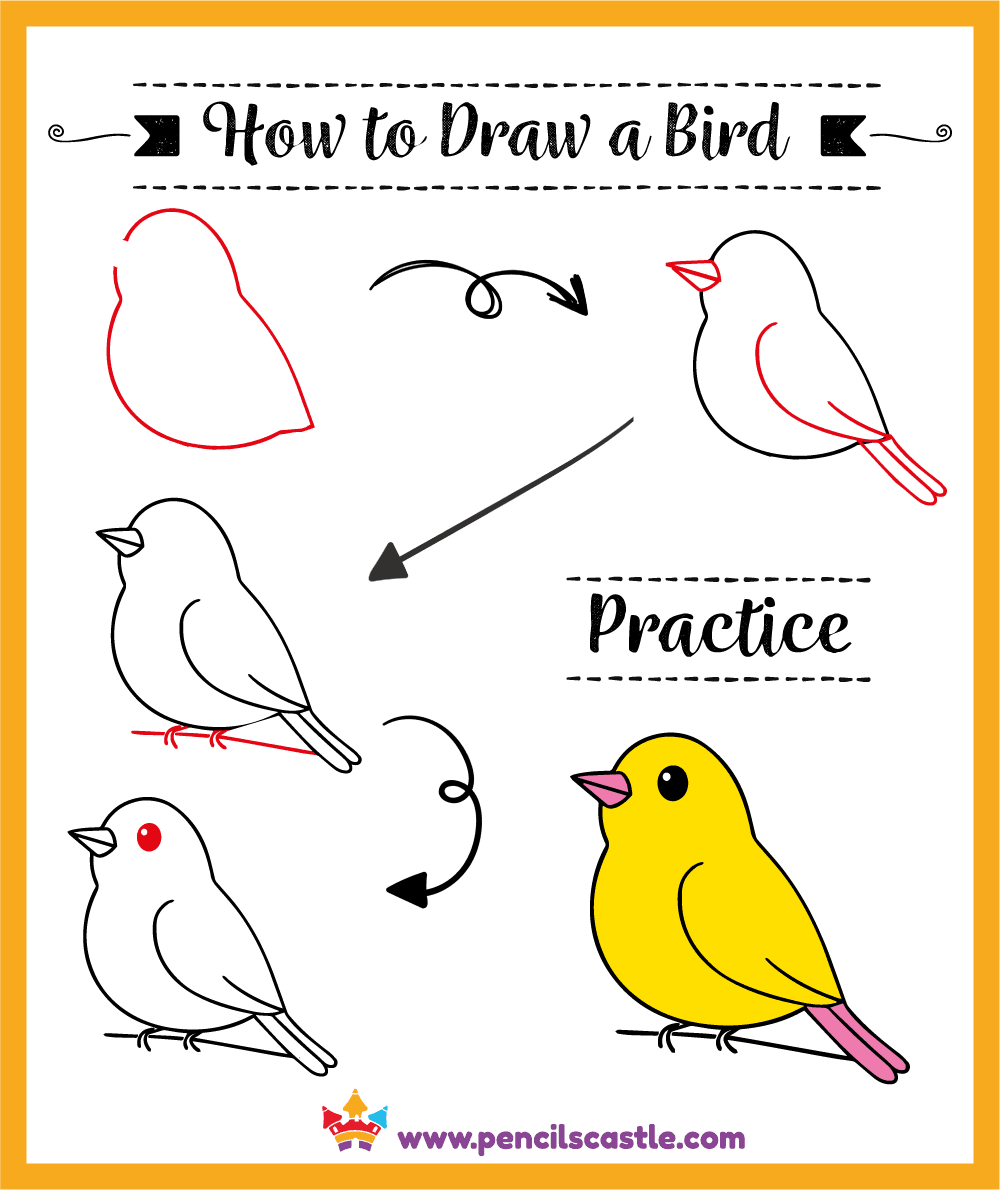
Birds
Become A Super Fan

If you love our content, consider becoming a member of our super fans club. Your support helps us keep the magic of Pencils Castle alive!
Shop Our Kids Drawing Books
Discover a world of creativity with our drawing books!
Each book is filled with cute activities to keep little hands busy with screen-free fun.
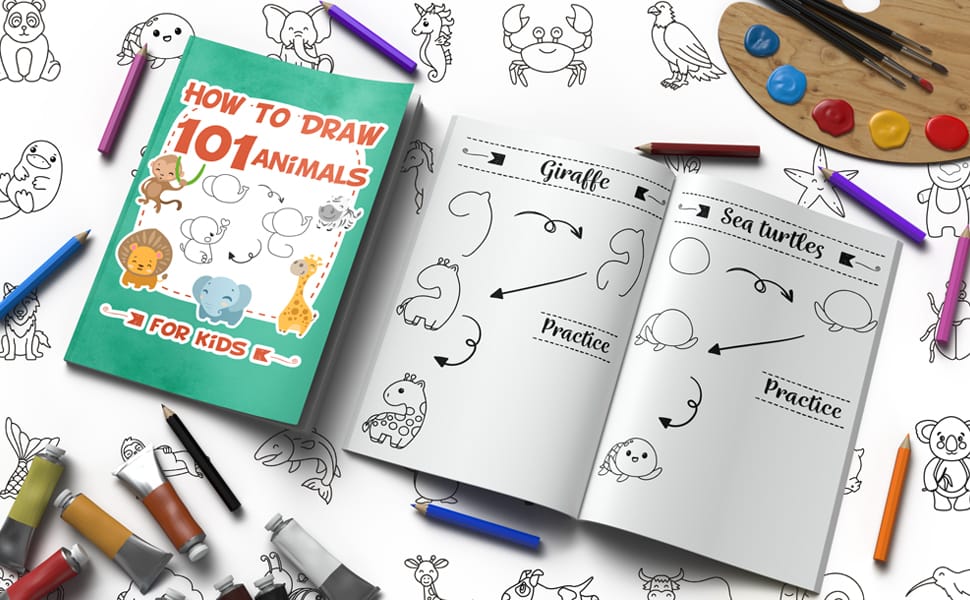
How to Draw 101 Animals
This exciting drawing book features 101 step-by-step tutorials. With easy shapes, simple steps, and tons of cute animals to choose from.
unleash the animals!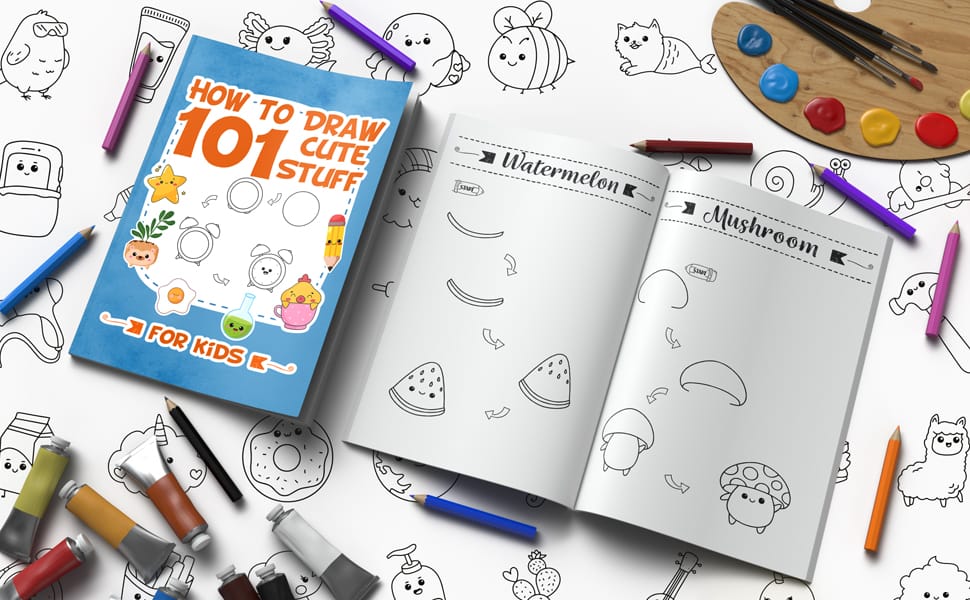
How to Draw 101 Cute Stuff
Learn to draw 101 cute characters and fun items! This book breaks down adorable designs into simple, step-by-step lessons for kids.
get the cute stuff!20 Fun Activities to Do with These Easy Drawing Guides
These step-by-step guides are not just for copying—they are tools for developing creativity, improving fine motor skills, and sparking imagination! Here are twenty fantastic ways to use these tutorials to level up your drawing practice:
1. The Creative Style Swap
- Start by following the drawing guide exactly as shown to learn the basic shapes.
- Now, try drawing the same subject again, but deliberately change the style: try drawing it as a cartoon character, a realistic sketch, or a simple geometric design.
- Experiment with different textures and shading techniques to give the drawing a new personality.
2. Draw Your Own Mini Comic Strip
- Select two or three simple subjects (e.g., a bee, a puppy, and a bird) from different guides.
- Use the tutorials to draw the subjects onto a piece of paper divided into 3-4 panels.
- Add speech bubbles or thought bubbles to the characters, turning your drawing into a funny, short story.
3. The Memory Retention Challenge
- Choose a simple guide and study the steps carefully for five minutes.
- Put the guide away (or cover it up).
- Try to draw the entire subject from memory, relying only on the shapes you remember. This is a great exercise for visual recall.
4. Turn Drawings into Stickers or Magnets
- Draw the subject onto heavy card stock or printable sticker paper.
- Color the drawing vibrantly and cut it out neatly.
- If using card stock, glue a small magnet piece or a double-sided tape loop to the back to turn your finished art into custom refrigerator magnets or wall decals.
5. Exaggeration and Perspective
- Draw the subject once following the guide perfectly (e.g., a simple cat).
- Next, draw the cat again, but exaggerate one feature drastically (e.g., give it enormous eyes, tiny legs, or a massive tail).
- This helps kids understand proportion and adds humor to their art!
6. Collaborative Drawing Game (The Add-On)
- The first person draws only the very first step of the guide (e.g., the main circle).
- The second person looks at the guide and adds the second step.
- Continue passing the paper back and forth until the drawing is complete. This encourages attention and teamwork.
7. Create a Custom Art Portfolio
- Use the drawing guides to draw large, detailed subjects (one per corner) onto a plain folder or binder.
- Use these drawings to decorate the outside of a plain portfolio where all the finished art pages and worksheets will be stored.
8. The Color Key Challenge
- Before starting the guide, select only three crayons or markers (e.g., blue, green, and yellow).
- Complete the entire drawing using only those three colors.
- This forces creativity and makes the artist think about how colors can be mixed or used for shading.
9. Make Mini Flip-Book Animations
- Tear off the bottom right corner of a small notepad or stack of paper.
- On the first page, draw the subject in a starting position (e.g., a small dog sitting).
- On the next page, draw the dog slightly moved (e.g., one paw raised).
- Continue for 10-15 pages. When you flip the pages quickly, the drawings appear to move!
10. The Texture Fill Experiment
- Draw the outline of the subject following the steps exactly.
- Instead of using color, fill in the large sections using different drawing techniques: cross-hatching (lines crossing), stippling (dots), or scumbling (scribbled circles).
- This helps develop control and understanding of line quality.
11. Custom Greeting Cards
- Draw the chosen subject in the center of a piece of paper.
- Carefully fold the paper into a card shape once the drawing is complete.
- Write a personalized message inside for a friend or family member.
12. “What If?” Scenario Drawing
- Draw the subject (e.g., a simple cat).
- Now, draw the same cat but imagine a “what if” scenario: What if the cat was flying? What if it was underwater? What if it was covered in flowers?
- Draw the subject reacting to this impossible or new environment.
13. Focus on Negative Space
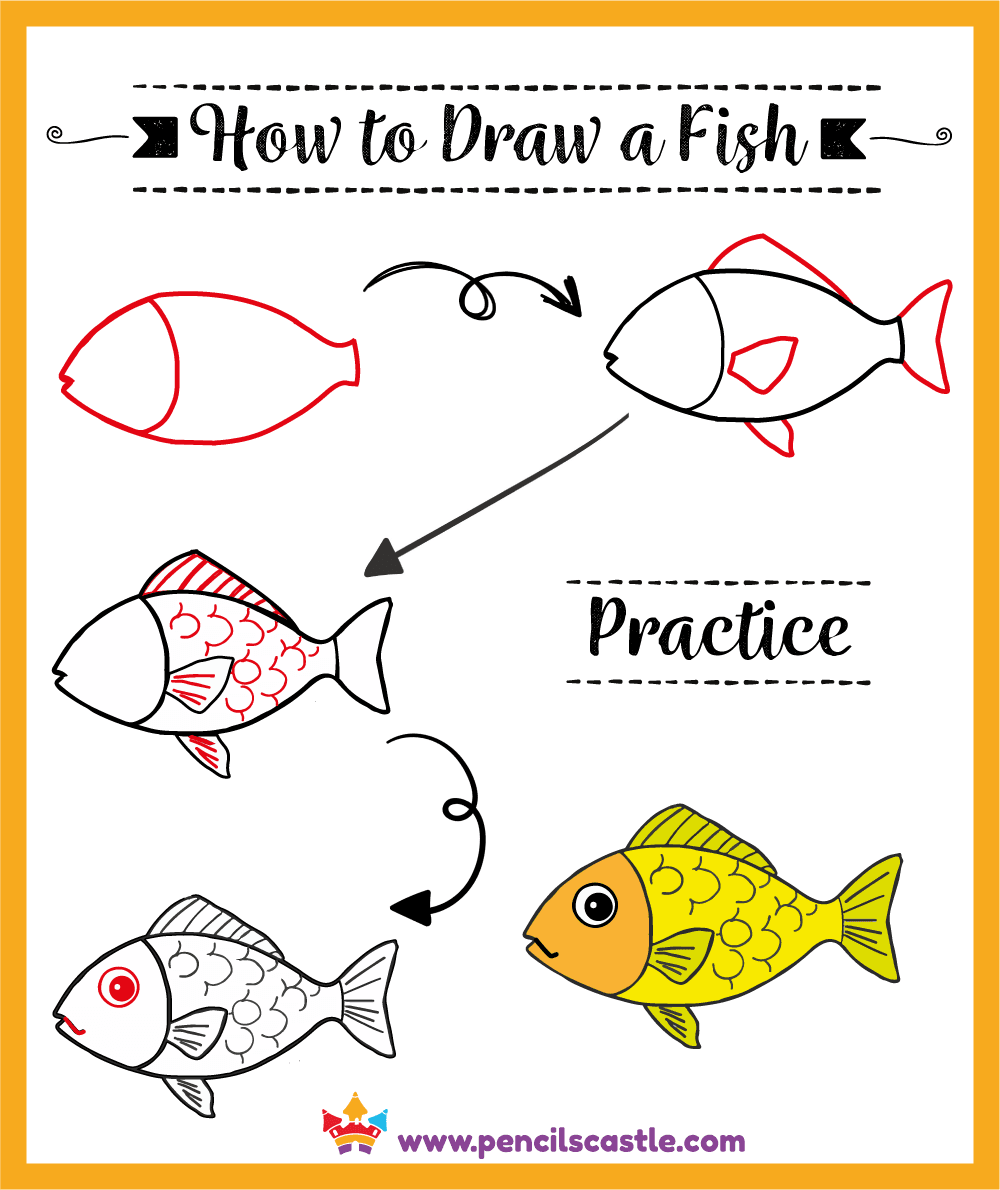
- Draw the subject (like a simple fish or butterfly).
- Instead of coloring the object itself, focus on shading and drawing the empty space around the object.
- This technique trains the eye to see the background and foreground equally, a core art skill.
14. Turn Drawings into Stencils
- Complete a simple guide on sturdy card stock.
- Carefully cut out the major shapes of the finished drawing.
- You now have a custom stencil to use with paint or sponge printing!
15. The Grid Method Practice
- Draw a simple grid (e.g., 4×4 squares) lightly over a finished drawing.
- Draw the same 4×4 grid onto a new, blank sheet of paper, but make the new grid slightly larger.
- Copy the lines from the small grid square by square onto the large grid. This is the professional way to practice scaling and proportion.
16. The Background Story
- Complete the chosen drawing subject (e.g., a happy puppy).
- Now, challenge yourself to spend three times as long drawing a detailed background that tells a story about the subject (a park, a house interior, or a beach).
17. DIY Pendants or Keychains
- Draw a small subject (like a bug or a bird) onto shrinking plastic (Shrinky Dinks) or heavy cardboard.
- Color it brightly.
- If using cardboard, cut it out and cover it in clear packing tape to seal it. Punch a hole and attach a key ring or string for a personalized gift.
18. Line Quality Experiment
- Draw the same subject five times using five different tools: a fine-tip pen, a thick marker, a crayon, a light pencil, and a piece of charcoal.
- Compare how the different tools change the appearance and texture of the final image.
19. Sketchbook Journaling
- Use the drawing guide to create a simple subject at the top of a journal page.
- Below the drawing, write a short story, poem, or fun fact about the subject (e.g., facts about the animal, a story about the object). This combines art with literacy.
20. The Time Limit Race
- Set a timer for 60 seconds.
- Try to complete the entire drawing outline from your chosen guide before the timer goes off, focusing only on speed and capturing the main lines.
- This helps loosen up the artist and encourages quick sketching skills.
Drawing Guides by Age: Suggestions for Ages 2-4, 5-8, 8+
Dear parents, guardians, and educators, Selecting the right drawing activity for a fun and successful creative experience is now simplified. This guide streamlines your choice by highlighting the best content, focus areas, and learning goals for three core children age groups.
Drawing Guides for Ages 2–4
Focus: Grip, Mark, and Experiment.
The Goal: Moving from random, instinctual scribbles to drawing controlled lines and basic closed loops (circles). The emphasis is purely on the physical act of creating marks.
Recommended: Non-toxic chunky mediums (crayons, jumbo chalk), large sheets of paper taped down, simple finger painting, and the introduction of primary colors.
Estimated Activity Duration: 3–5 minutes (short, frequent bursts).
Drawing Guides for Ages 5–8
Focus: Symbols, Scenes, and Emotional Expression.
The Goal: Developing a repeatable “schema” (their symbolic way of drawing a person, house, or tree). They begin using shapes to tell simple stories and understand relative position (ground vs. sky).
Recommended: Fine-point markers, pencils, drawing subjects in action (running, jumping), creating complete scenes with sun/house/people, and experimenting with patterns.
Estimated Activity Duration: 10–20 minutes.
Drawing Guides for Ages 8+
Focus: Observation, Value, and Accuracy.
The Goal: Learning to observe the world and translate its proportions, depth, and lighting onto a 2D surface. They move away from symbolic drawing toward realism.
Recommended: Sketching pencils (H/B grades), learning about perspective (vanishing points), focusing on shadow and light (value scale), and mastering facial expressions/human proportions.
Estimated Activity Duration: 20–40 minutes (allowing time for detail).
Using Drawing Guides in the Classroom: Group Work and Assessment Ideas
Dear teachers, our simple, step-by-step drawing guides are perfect tools for reinforcing foundational concepts in a fun, low-pressure environment. Since all the drawings rely on basic shapes (circles, squares, triangles) and easy lines, they can be seamlessly integrated into both group collaboration and standards-based assessment.
Group Work Strategies (Collaboration & Communication)
These activities use the drawing guide steps to encourage teamwork, communication, and mutual problem-solving.
- “Pass-the-Paper” Collaborative Drawing:
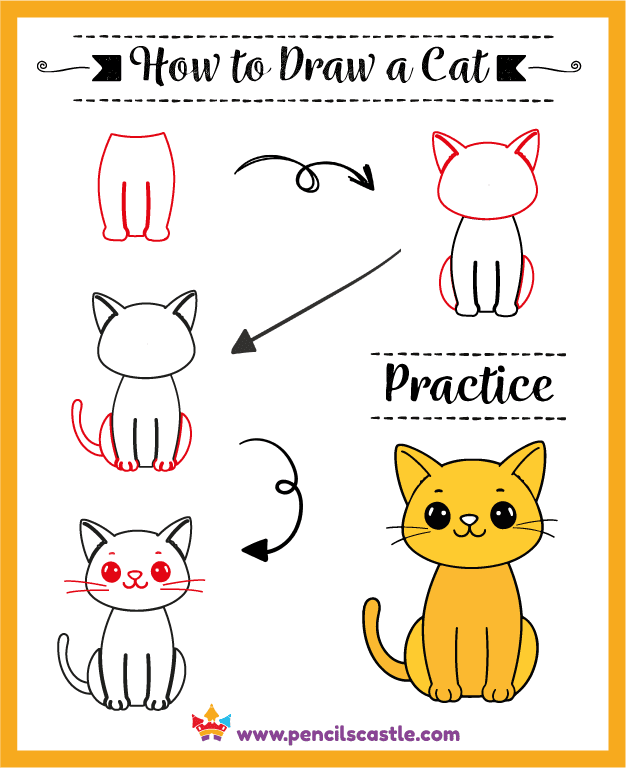
- Activity: Divide students into groups of 3–4. Each student starts with a blank piece of paper and the same drawing guide (e.g., “How to Draw a Cat”).
- Process: Set a timer for one minute. The student draws only the first step (the basic shape). When the timer goes off, they pass the paper to the next person, who draws the second step, and so on.
- Goal: The group must collaboratively finish all the steps in the guide. This forces students to follow instructions precisely and clearly communicate when they are stuck.
- Verbal Direction Challenge:
- Activity: Pair students up. One student (the Director) sits facing the drawing guide. The other student (the Artist) sits with their back to the guide and a piece of paper.
- Process: The Director describes the steps of the guide using only words (e.g., “Draw a large oval near the bottom of your paper,” or “Now add two small triangles to the top of the oval”). The Artist draws based only on the verbal instructions.
- Goal: Assesses the Director’s ability to use precise art vocabulary and the Artist’s ability to follow detailed instructions.
- “Shape Inventory” Group Work:
- Activity: Before drawing, in small groups, students look at the finished drawing from the guide.
- Process: The group creates a list of all the basic shapes they think were used to build the image (e.g., “Two big circles for the body,” “Six triangles for the wings”).
- Goal: This reinforces the core concept that complex objects are built from simple shapes, boosting pre-drawing analysis skills.
Assessment Ideas (Process & Concept Checks)
Focusing the assessment on the process and the concept (basic shapes, types of lines) is more effective than just grading the final picture.
- Formative Check: “Draw in the Blank” Quiz:
- Assessment: Create a simple worksheet with common art terms or shapes. Ask students to demonstrate their understanding through drawing.
- Example: If the term is “Geometric Shape,” the student draws a square or triangle. If the term is “Organic Line,” they draw a wavy line.
- Goal: Checks recall and application of basic visual vocabulary.
- Process-Based Grading (Rubric Focus):
- Since our drawing guides use steps, assessment can be tied directly to those steps.
- Criteria: Use a simple rubric focused on:
- Following Directions: Were all the steps completed correctly? (Assesses listening/reading comprehension).
- Use of Shapes: Were the correct basic shapes used to start the drawing? (Assesses foundational art concept).
- Craft/Effort: Is the line work neat? Did the student attempt to fill the paper?
- Goal: Grades the learning journey and effort, not just artistic talent.
- Peer Critique and Reflection (“Two Stars and a Wish”):
- Assessment: After finishing a drawing, students pair up. They use a simple structure to give feedback on their partner’s work.
- Process: Each student points out two “stars” (two things they think their partner did well, e.g., “I like how neat your circle is,” or “You followed the steps perfectly”) and one “wish” (one thing they could improve, e.g., “I wish you had made your lines darker”).
- Goal: Develops critical thinking skills and the ability to articulate strengths and areas for growth using positive, constructive language.
Frequently Asked Questions
Yes! Our Simple Step-by-Step Tutorials are specifically designed for absolute beginners and young children. Each guide breaks down the final drawing into the simplest possible shapes (circles, squares, lines) and builds upon them sequentially. If you can draw a basic shape, you can successfully follow our guides. We guarantee success for first-time artists!
The PDF practice sheets are provided in the standard international and US letter paper size: 215.9 mm x 279.4 mm (8.5 inches x 11 inches). This ensures easy printing on all standard home and classroom printers.
The worksheets are free for personal and educational use. Commercial use, including resale or redistribution, is strictly prohibited.
You only need the essentials! We recommend starting with a simple pencil (like an HB or 2B) and an eraser. Once you feel confident with the lines, you can move on to outlining the final drawing with a thin black marker or a pen, and then adding color with crayons, colored pencils, or washable markers.
For practice, standard 20 lb bond printer paper works great and is cost-effective. However, if you plan to create a final artwork that you want to keep, we recommend using a slightly heavier paper, such as sketchbook paper or thicker card stock (around 65 lb), as it holds color better and prevents indentations.
Thank you for visiting Pencils Castle! We’re excited to help your child explore and create! Happy Drawing!